wbAMP analytics tag
As with everything on your site, it is very important to track how your Accelerated mobile pages are used, especially for something as new as AMP. The specification allows for using multiple analytics services providers, but currently only Google Analytics and Google Tag Manager support is handled by wbAMP.
Analytics settings
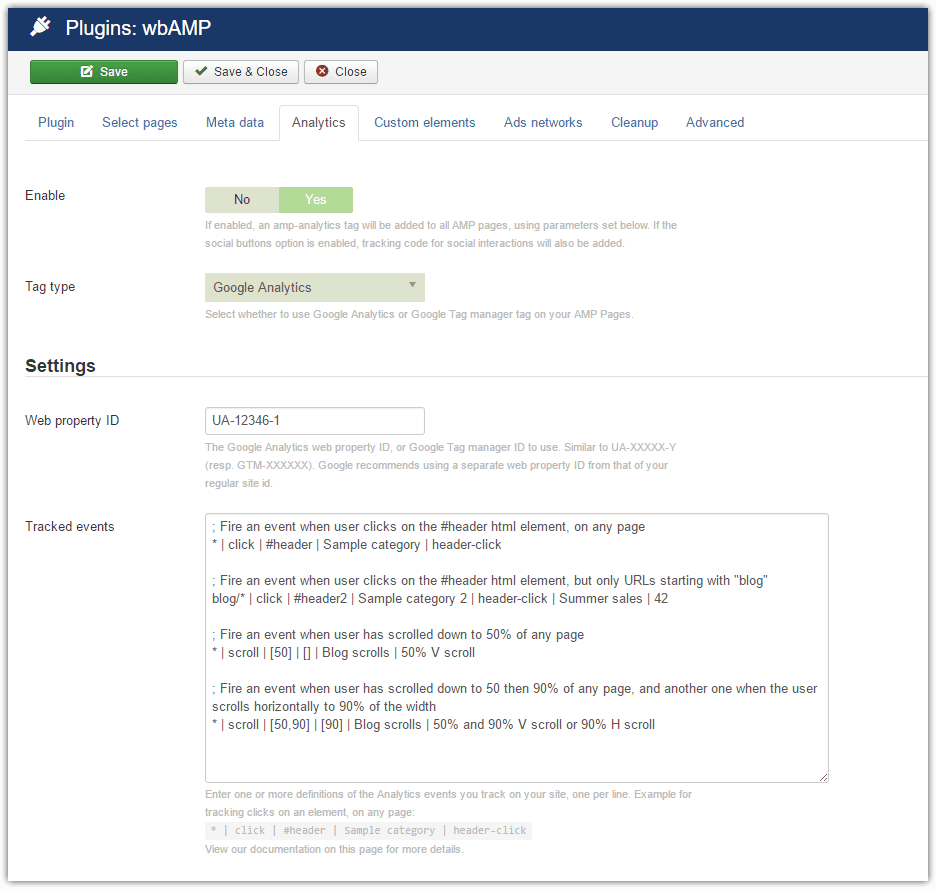
To get started, you only need to enable Google Analytics/tag manager, and provide a valid Web Property ID.
You can always use other Analytics providers than Google by creating a JLayout template override for the related wbAMP JLayout:
wbamp.tags.analytics
Tag Type
A simple selector to decide whether you want to use Google Analytics or Google Tag Manager. AMP only allows to have one of them at a time.
If using Google Tag Manager, the only configuration required is to enter your GTM ID in the Web Property ID field. Any further configuration is made in GTM itself.
Note however that you must create and use an AMP-specific GTM container: you cannot simply re-use your current GTM id for AMP Pages. Please see below for more details.
Client ID API
wbAMP implements the Client ID API, which makes sure AMP pages are tracked properly when displayed on Google Cache and on your site.
Using Google Analytics
wbAMP implements fully the Client ID API on AMP pages. But you must also include some code on the standard version of your pages. If you use sh404SEF to enable Analytics, this is done automatically for you (with version 4.10.1 or more recent of sh404SEF).
If you do not use sh404SEF, you have to modify the output of your analytics snippet, as described in Google documentation:
ga('create', 'UA-[redacted]X-Y', 'auto', {'useAmpClientId': true});Please always check the linked documentation page to be sure the code change is up to date.
Using Google Tag Manager
Please refer to the specific paragraph at the bottom of this page.
Events tracking
wbAMP lets you take advantage of the advanced event tracking features of amp-analytics. They are described on this page of Google Analytics documentation, and the amp-analytics components reference documentation can be found here. Event tracking is a rather advanced topic, but can provide great information about the behavior of your visitors. For instance you can learn about which and when buttons are clicked, or whether visitors scroll down to see your content.
This section only apply to using Google Analytics. If you use Google Tag manager, all event tracking is done inside Google Tag Manager itself, as usual.
You set up event tracking by adding configuration lines to the Events tracked parameter (see screenshot above). You can add event tracking to all pages, or only to some pages. In fact, you can have different tracking for different pages. The syntax is as follow:
- one event tracking definition per line
- each line starts with a page selection rule followed by one of the supported events (list below)
- after the event name, appropriate parameters are listed, each separated by a
|character - if you start a line with a
;character, the line is considered a comment and not taken into account. Help remembering what each line is for, or temporarily enable/disable lines - if you put a
-as the only character on the first line of the input field, then the entire event tracking is disabled. Useful for testing for instance
As we use the
|character to separate each parameter on a line, please be sure to not use any|in them, particularly in your descriptive labels.
Event: click
This event lets you track clicks on pretty much any HTML element, as long as you can select it with a CSS selector (CSS class combination, id). As per Google Analytics documentation, you need to specify the following information
* | click | css_selector | eventCategory | eventAction [|eventLabel] [|eventValue]*: page selector. All pages are selected with the*symbol. See paragraph below about page selectionclick: event typecss_selector: a CSS selector to an HTML element that exist on your page such as #call-to-action-1 or #header. You can specify multiple selector on the same line, separating them with commas:a.next,a.prev,#go-to-firsteventCategory: an arbitrary category for the eventeventAction: an arbitrary action name for the eventeventLabel: not required - an arbitrary label for the eventeventValue: not required - must be an integer number, will be added up to a total at each event
Here are 2 examples:
* | click | #header | Sample category | header-click
* | click | #header2 | Sample category 2 | header-click | Summer sales | 42
The first line will cause clicks on the HTML element with an id of #header to be tracked by Analytics, under the Sample category category and be identified as a header-click action. The second line will do the same for a different element and category, but will add a label of Summer sales and increment the counter associated with this event by 42.
As both lines start with *, these event tracking instructions will run on all pages of the site.
Again, be sure to actually check the specific Google Analytics documentation page for details about those settings.
Event: scroll
Likewise, the scroll event can be tracked by adding a line defined as follow:
* | scroll | verticalBoundaries | horizontalBoundaries | eventCategory | eventAction [| eventLabel] [| eventValue] *: page selector. All pages are selected with the*symbol. See paragraph below about page selectionscroll: event type-
verticalBoundaries: a list of vertical scroll positions at which you want the event to be fired. Each position is considered a percentage, and should be an integer number between 0 and 100. Use[]if you do not want to track this scroll direction.The list must be separated by commas and surrounded by square brackets:
[25,50,90]or[42] horizontalBoundaries: a list of horizontal positions to fire the event, with the same syntax. Use[]if you do not want to track this scroll direction.eventCategory: an arbitrary category for the eventeventAction: an arbitrary action name for the eventeventLabel: not required - an arbitrary label for the eventeventValue: not required - must be an integer number, will be added up to a total at each event
Here are 2 examples:
* | scroll | [50] | [] | Blog scrolls | 50% V scroll
* | scroll | [50,90] | [90] | Blog scrolls | 50% and 90% V scroll or 90% H scroll
The first line will cause vertical scrolling to 50% to fire an event. The second line will cause the same at 50% and 90% vertical position, plus another event fired if the page is scrolled horizontally to 90%.
You can find details about the scroll event on the amp-analytics page.
We currently only support the feature set of Google Analytics. The following amp-analytics triggers are not supported:
timer,visibleandhidden
Page selection
In all examples above, we have seen each event tracking specification started with *. This is the page selection rule, which decides on which page of the site the given event tracking will happen or not. This page selection rule lets you fairly easily specify individual pages or groups of pages. The rules you enter are based on the SEF URL of the page.
Basic elements
You specify a rule by listing entire URLs, or part of URLs:
- Use only the part of URL after the domain name:
/growersis OK,https://www.mysite.com/growersis NOT OK. - Use the
*symbol to indicate any string of characters:/growers/*matches any SEF URL that starts with /growers/, regardless of what's after it - Use the
?symbol to indicate any single character:/growers/2?-happy-orange-orchardmatches any URL with any letter instead of the ?
Examples
*: selects all pages of the site/growers/: exactly /grovers/. Selects only the /growers/ URL (it needs to have the trailing slash). It won't match /Growers for instance, as this has a capital G at the beginning, and no slash at the end/?rowers/: / followed by any single character followed by rowers/. This will select /growers/, /Growers/ but also /prowers/ or /2rowers/. It won't select /XXrowers/, because there are 2 X, while we allow only one varying character/growers/*: /growers/ followed by any string of characters. Will select, for instance: /growers/, /growers/23-happy-orange-orchard, /growers/something.html/growers/23-happy-*-orchard: /growers/23-happy- followed by any string followed by -orchard. Will select, for instance: /growers/23-happy-orange-orchard, /growers/23-happy-red-orchard, /growers/23-happy--orchard but not /growers/23-happy-orange-orchard-llc, because it ends with -orchard-llc instead of -orchard*/growers: any URL ending exactly with /growers. Will select, for instance: /growers, something/growers but not something/growers/ (because there is a trailing slash) or something/growers.html (because of the .html at the end)*hello*: any URL that has hello somewhere. Will select for instance: i-say-hello-world, but also hello-world or i-say-hello*hello*goodbye: any URL that has hello somewhere, followed by any string of characters and then ends with goodbye. Will select for instance: i-say-hello-world-i-say-goodbye, hello-world-goodbye, i-say-hello-you-say-goodbye. It will not select i-say-goodbye-you-say-hello
Google Tag Manager settings
If you select Google Tag manager as your analytics method, all setup other than entering your GTM ID is done through Google Tag manager itself.
As mentioned earlier though, you must use an AMP-specific Google Tag Manager container. You cannot simply re-use your existing GTM container ID, as standard GTM containers are not AMP-compatible.
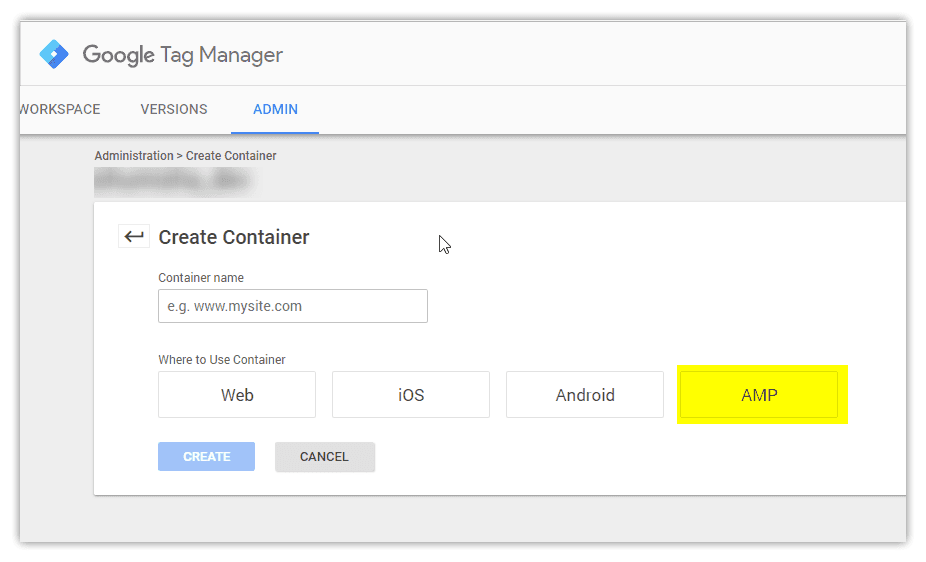
Container type
When creating your AMP GTM container in Google Tag Manager admin page, be sure to select the AMP container type:
Client ID API
As already mentioned, wbAMP implements the Client ID API. When using Google Tag Manager, you also need to enable this feature in GTM itself.
Important: these steps must be taken on your standard tag container, not on the AMP container.
- Navigate to Tag Configuration > Fields to Set.
- Set useAmpClientId to true.
- Save the new tag configuration.
Please refer to the linked Google documentation for up to date information on how to do this.