The Pages page
As 4SEO progresses through your website analysis, it will list on the Pages page all the pages it has found on your site, assuming your have not excluded them from the analysis.
This is the place where you can have a global view of what 4SEO discovered about the pages on your site. It's also the place where you can easily view and modify metadata and other SEO elements per page. Lastly, you can set up simple redirects for a page right from the list.
You can also change per page metadata and other information directly from that page itself, on the frontend.
Information displayed
On the list itself
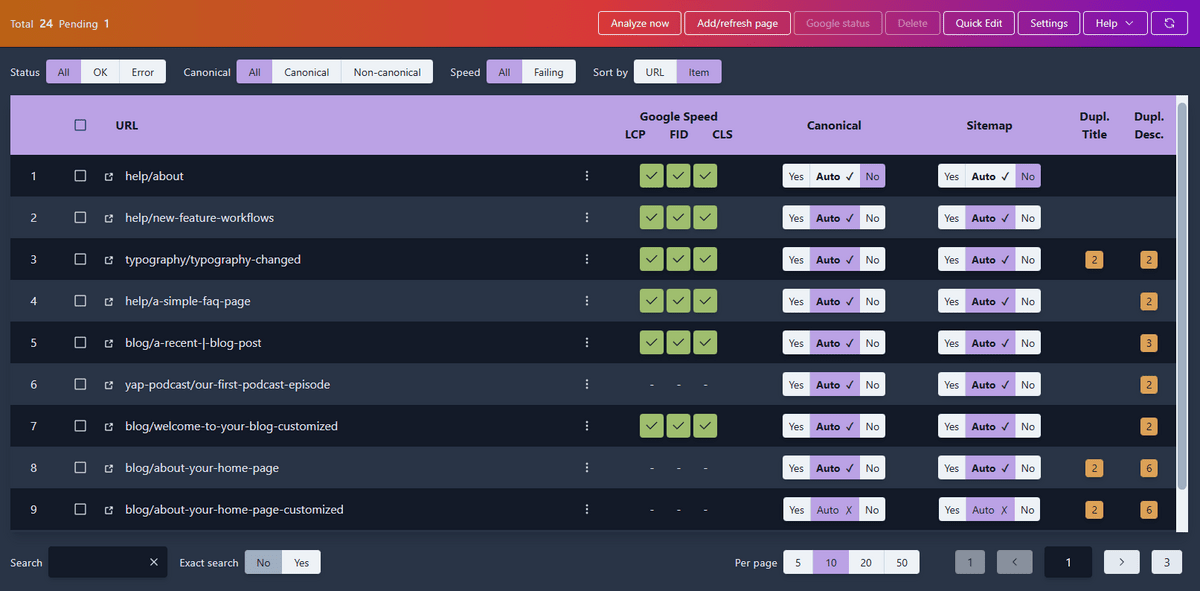
The list gives an overview of the most important information about all pages:
- its URL
- whether it's canonical
- whether it will be included in the sitemap
- whether it passes or fails Core Web Vitals performance tests
How to read the Canonical and Sitemap columns
The Canonical and Sitemap columns use a multipurpose button that both shows the result of 4SEO decision, and lets you change it. Here is an example:
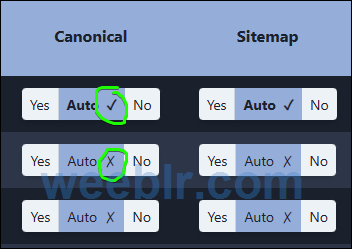
By default, Auto mode is selected and that button also tells you the decision:
On the Canonical column:
-
✓: this page is canonical -
✗: this page seems like a duplicate of another one (it will automatically receive arel="canonical"pointing to the canonical page)
On the Sitemap colum:
-
✓: this page be included in the sitemap -
✗: this page not be included in the sitemap
If you agree with the decisions 4SEO takes about that page, then do nothing.
If you disagree with the decisions it made, click Yes or No, to change the decision.
For instance, here 4SEO decided automatically that a page should be in the sitemap, but we didn't agree and therefore clicked the No button, to force it to be excluded from the sitemap:

Google Search Console data for a page
If you connected 4SEO to your Google Search Console account, you can view all data that Google knows about your page, including errors, by:
- selecting the page in the list and clicking the
Google statusbutton in the toolbar
or
- opening the local 3-dots menu for that page, and selecting
Google statusthere
Detailed information and modifying metadata
By clicking on a page in the list, you can view detailed information about that page, and modify metadata and other SEO elements. There are 3 sets of things you can review or modify, each on its own tab:
- General metadata and QRCode
- Social networks metadata
- Aliases
General metadata
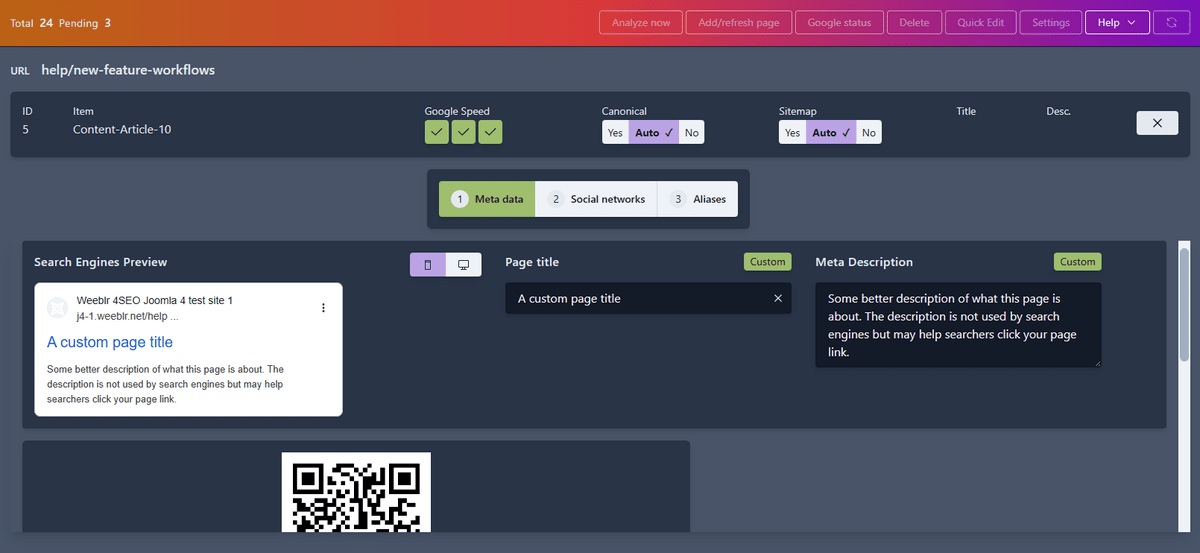
This tab presents you with a realistic Search Engines Results Preview (SERP). That preview shows you how the current page will look in both the Desktop and Mobile version of Google search results.
You can then use the other input fields around that preview to change title or description. The preview will update automatically and as you type.
The Page title and Meta description fields are empty when you start. That's normal. They are only here to let you override existing title and description.
The current title and description for the page are these shown in the Search Engines Results Preview area.
Metadata you can change are:
- page title and meta description
- canonical link
- robots
Next to each input field, you'll see a colored tag showing: None, from Joomla or Custom. This tells you where the current value comes from. If you change the value, it will be set to Custom.
The page title is truncated based on a width in pixels used by Google in their display.
The description meta is truncated by default at 160 characters. This is an approximation, as Google does not use a specific character count to truncated description display but should work in most cases. You can change this meta description length with the Recommended description length option found under Pages | Settings | Pages.
QRCode
For each individual URL, you can find a QRCode that represents the URL of that page. You can download that QRCode as a PNG or SVG file, to include in printed material or other types of display.
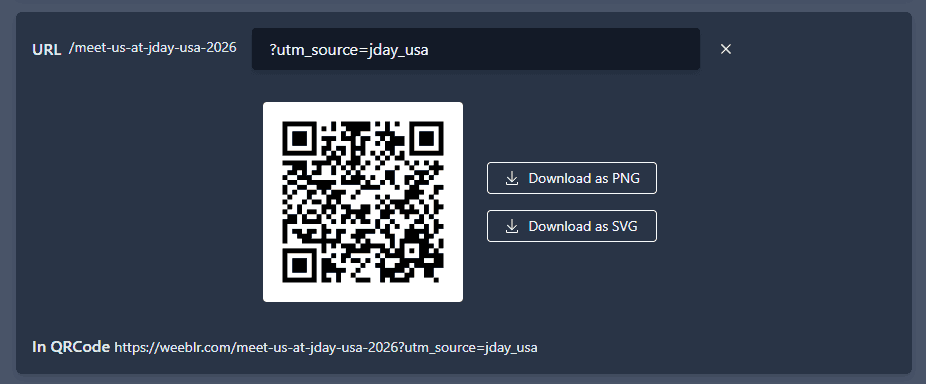
You can optionally append parameters to the end of the URL encoded in the QRCode. In the example above, we added an utm_source parameter that can be tracked by analytics tools to measure how many visitors came to the page after scanning the QRCode.
Social networks
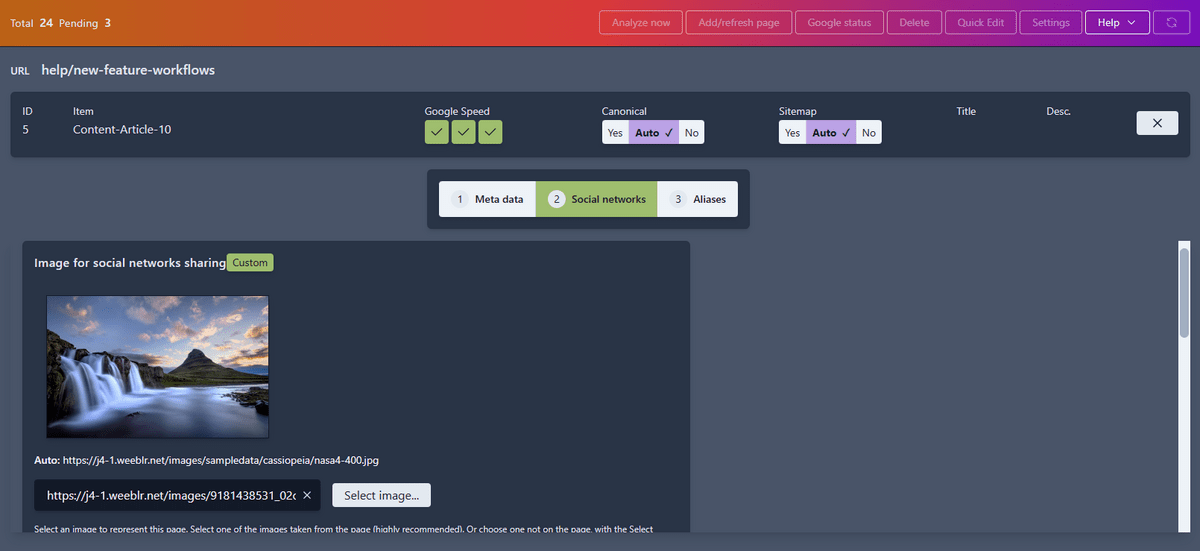
On this tab, customize the metadata used by social networks when sharing your pages:
- OpenGraph image, title and description (Facebook, LinkedIn, Pinterest)
- Twitter Cards title and description
After adjusting the metadata for social network sharing, you can directly click the Go to Facebook debugger button to test the result directly on the official Facebook debugger tool.
Aliases
An alias for a page is another URL by which that page can be reached. It is in fact technically a redirect. You would normally use a Redirect rule to configure redirects for a page.
Redirect rules are easy to use and extremely powerful, and they are most useful to redirect a group of pages to either one or a set of other pages.
But in some cases, you just want to redirect one page to another one. In such case, using an alias is simpler and faster than creating a redirect rule:

In this example, loading the /workflows URL in your browser will redirect you to /help/new-feature-workflows (using a 301 status code, ie a permanent redirect).
To create an alias:
- find the page you want to redirect to and click on it
- select the
Aliasestab - in the
List of aliases, enter one or more URL you want to redirect from - click the
Save aliasesbutton to save your input
Note that aliases cannot use wildchar characters such as {*} or {?}. Aliases are simple, straight redirects and can only redirect one URL to another. For more sophisticated use cases, go for a redirect rule instead.
To delete an alias
- find the page you want to remove the alias for
- select the
Aliasestab - in the
List of aliases, delete the line with the alias you want to remove - click the
Save aliasesbutton to save your input
You have to save your changes
Contrary to most pages in 4SEO - where all changes are saved automatically for you, you must use the Save aliases button for your changes to be taken into account.
All Aliases are also listed under the Tools | Redirects page. You can search and delete them there in a convenient way.