How to manage your podcast episodes
4podcast provides a simple, yet powerful way to manage your podcast episodes. You can create, modify and delete episodes from within Joomla, using the standard Joomla article manager.
What is a podcast episode?
An episode in itself is a single article, with a single audio file, a title, a description, a duration, and few other pieces of metadata.
Similar to a 4Podcast show is associated with a Joomla category, an episode is simply defined by filling in the custom fields value displayed on the article edit page.
How to create a podcast episode
Prerequisite: Start by creating a podcast
1 - Record your podcast episode
To create a podcast episode, you must have:
- something to say :)
- recorded the audio for that episode
2 - Upload your media file to a public location
Your episode media file (mp3, ogg,...) must be available to the public, so it can be downloaded by podcast players and apps.
The simplest way to do this is to upload it to your website using the standard Jomla media manager. We advise to store all episodes under a dedicated folder, for instance images/4podcast/episodes.
Although this seems a bit odd, all files uploaded through the Joomla media manager - music, audio, video, pdf, etc - must go inside the images folder, or a subfolder within it. This ensures that the media manager can find them and that they are served by your web server in the best conditions.
From Joomla 4, you can however differentiate between image files and other file types. By default, Joomla 4 also stores everything in the images folder, but you can select separate folders for images and other file types in the media manager options.
Joomla 3 does not let me upload mp3 files through the media manager
By default, under Joomla 3, it is possible that the mp3 file extension is not allowed for upload in the media manager. This is easily changed by going to Joomla Global Configuration | Media Manager and then:
- under
Legal Extensions (File Types), addmp3to the list of allowed file types - under
Legal MIME Types, addaudio/mpegto the list of allowed MIME types
Save after making the changes and you should be able to upload mp3 files through the media manager.
You can also upload your media files to hosting services such as Cloudflare R2 or Amazon S3 or similar. If you do so, be aware of the following:
- the files must be publicly accessible, you must have a public URL to them
- file access from that service must be fast, listeners won't like waiting for a file to download, or the episode being paused in the middle waiting for the remainder of the file to download
- these services may charge you for the bandwidth. Although rarely an issue - unless you have lots of listeners, just be aware of it.
We recommend storing your media files either on your own server, or use the Cloudflare R2 service. You get 10GB of free storage, download traffic is free and delivery is done through the Cloudflare network, which is very fast all around the world.
3 - Create a Joomla article in your podcast category
This article will be displayed normally on your website, as part of the show category content.
In the article body itself, we suggest you add any notes, links, reference that may be useful to the episode listeners.
Typically, these will be web pages links related to things discussed or mentioned in the episode, but it can be anything.
We recommend creating a menu item to your podcast category page. A Category blog menu item seems like a good choice, as it displays the category content in a blog layout, with the latest articles first.
4 - Add a transcript (optional)
Both for SEO and user experience, we recommend providing a full transcript of the podcast episode. Some people prefer to read rather than listen, and search engines will be able to index the content of your podcast, making it more likely to be found by people searching for the topics you cover.
On our Blog, each blog post is also a podcast episode. Meaning it's the text of the blog post that serves as a transcript. The podcast episode is basically a recording of the blog post being read out loud. This is a great way to leverage your content and make it available to more people.
You should enter the full transcript as part of the article main body, and format it as you see fit.
You can - but you should normally NOT - also enter the transcript in the Media description field. That field content:
- is not displayed on the website
- is usually displayed by distribution platforms on their podcast pages and player, but you have no control over that
You can use a transcript service to convert your audio to text, or your phone may be able to convert the audio to text for you.
5 - Locate the Fields tab in the article edit page
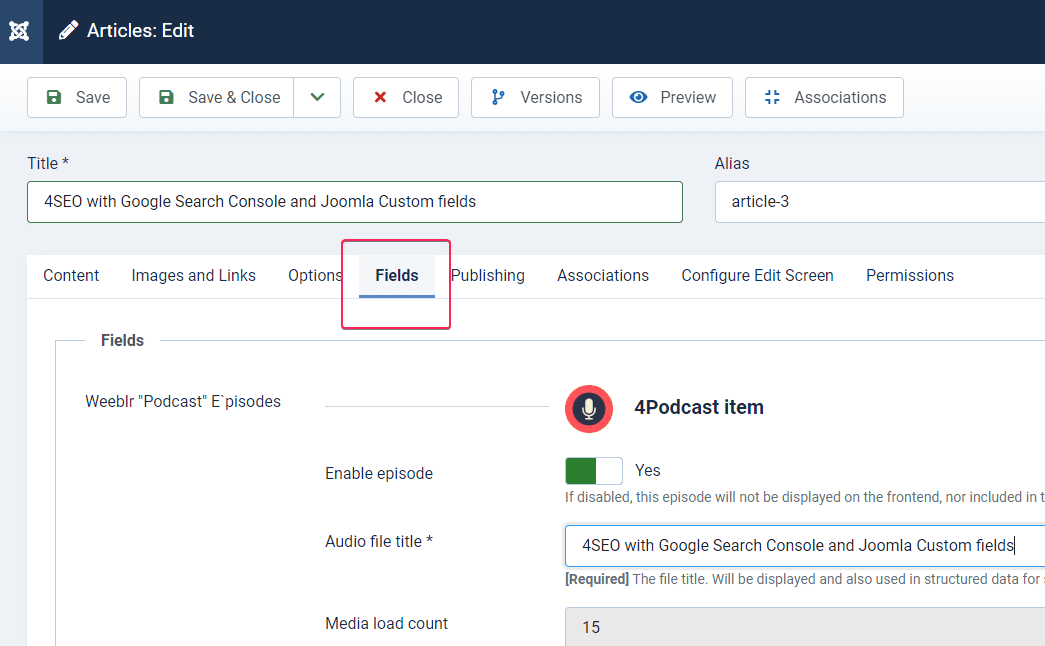
If you created a custom fields group as recommended, all options for the episode will be under a tab named after your group. For instance, we created a custom fields group called The Weeblr blasts for our podcast, and so all the episode options are under a tab named The Weeblr blasts.
6 - Fill in required custom fields values
The tooltips should make most fields self-explantory but here are details about the important ones:
Audio file title
The title of the episode, as it will be displayed on your website and by distribution platforms. Make it short and descriptive but catchy.
Media file in main format
This will be the full URL to the main audio file for this episode:
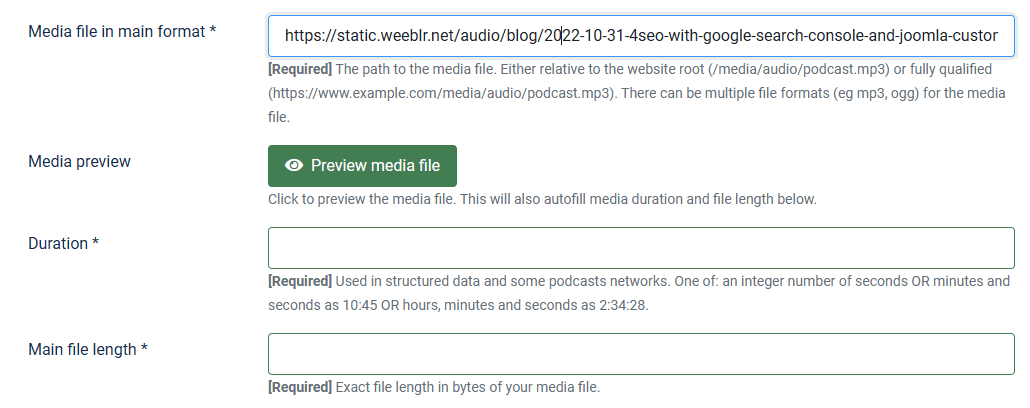
We recommend providing the main audio file as an mp3 file, as it is the most widely supported format
Additional file format
You can set 2 versions of the same episode under different file formats. For instance one as an mp3 file, and one as an ogg file. 4Podcast will technically include both and let the user browser chose which one they prefer.
In any case, one format must be set as the main one, and that's the one you should enter here.
Once you have entered the URL to the main audio file, you can click the Preview media file button to check that the file is accessible and can be downloaded:
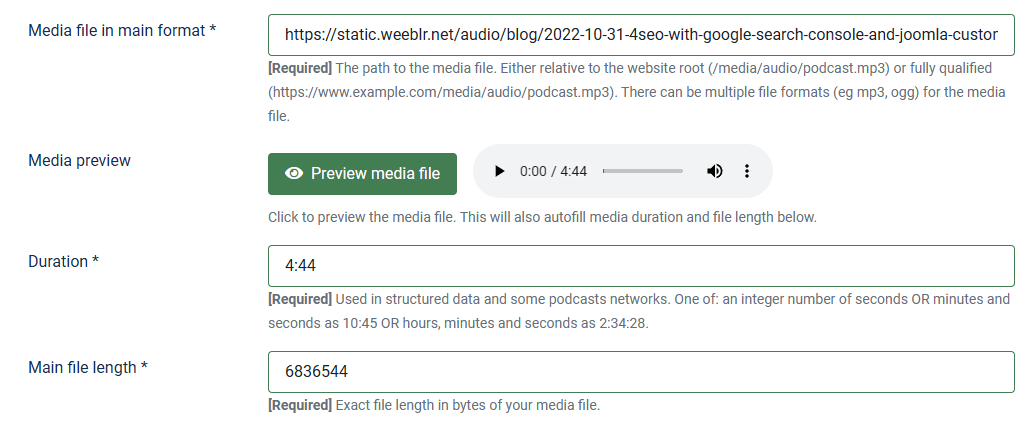
A small audio player is inserted in the page so that you can test your file.
Each time you click the Preview media file button, 4Podcast will reload the file and automatically retrieve its size and duration, and insert them in the form.
Main file length
This is the exact size of the media file in bytes. You can usually find this information in the file properties on your local machine but using the Preview media file button, 4Podcast will retrieve if for you.
Duration
The media file duration is needed to include in the RSS feed for most distribution platforms. You can find this information in the file properties on your local machine as well, and using the Preview media file button, 4Podcast can also read it for you.
7 - Optional but valuable fields
Although not required, we recommend filling in the following fields as well:
Image for this episode: a picture to display with the episode. This is optional if your podcast is just shown on your website but is mandatory if you use distribution platforms.Thumbnail for this episode: The image for the episode, as required by distribution platforms is large (at least 1400x1400px). As 4Podcast displays the image inside the audio-player on category and article pages, it's a (very) good idea to also provide a much smaller version of that image to be used just for podcast display on your site. Around 300x300px is usually fine.Generate structured data: not needed for your podcast itself, but can be useful for SEO. Generating structured data will help search engines understand the content of your episode, likely helping your SEO efforts. We advise leaving this option on at all times.